Tag Archives: education

Inspiration Artist ~ Nicole Ringgold

After discovering her work on Facebook in the online group Aspiring Metalsmiths, we were so inspired we had to reach out to her about her Botanical Series.  Here’s some great advice from an incredibly talented metalsmith and artist.  Every piece is hand forged, shaped, soldered and finished- pieces by piece, every intricate detail.
Botanical Series
Name:  Nicole Ringgold. Some people ask if I changed my name to fit my profession. Nope, it’s just a happy coincidence.
LJS: Where are you from originally:
NR: I was born in Massachusetts, but grew up in Switzerland and France. I have since lived in various US states, as well as in Niger, W. Africa. My home for the last decade has been in the Methow Valley, a community situated in the North Cascade Mountains in Washington State.

LJS:  Favorite show/movie/song of late?

NR:  My favorite musician is Macklemore…I’m more of an audiobook addict since I spend so much time in my studio. My favorite book of late is The Nightingale.

LJS:  What was the first piece of jewelry you ever made using either metalsmithing or carving techniques?

NR:  I took a couple of silversmithing courses in college over 20 years ago. I made a really fun ring with lost cast wax that I was proud of at the time.

LJS:  What’s a bench tip you’ve learned or figured out recently that’s changed your life?

NR:  My recent collection of botanical jewelry has taught me a tremendous amount about complex soldering, how to use heat syncs, how to heat just enough of the surrounding silver for the filler metal to melt perfectly into targeted seams, and how to make the most use of my pick while soldering.

LJS:  In your botanical series you create so many wonderful pieces, do you have a favorite among them?

NR:  Yes…this one. It’s a larch cone. Soldering on each of the tiny layers presented a challenge.

LJS:  Which piece challenged you the most as a metalsmith?

NR:  These poppy seed pods, primarily because it’s easy to explode a sphere while soldering on the additional components.

LJS:  Who’s your favorite artist, and how do they inspire you?

NR:  I can’t say that I have just one favorite artist, but I’ve recently discovered the work of John Grade: http://johngrade.com. I would love to take him out for a glass or two of wine and listen to his story. As an artists, how did he reach where he is today?

LJS:  We can tell that you find inspiration in nature, do you have any favorite places you go or things you do when you’re needing a little artisitic push?
NR:  I live in the mountains and work inside a greenhouse, both of which give me endless artistic inspiration. I am an avid hiker. I love hiking to high alpine lakes where I can jump in. I take pictures and collect samples of native plants to bring back to my studio. There, I literally dissect the plants to understand how they’re constructed, and attempt to reconstruct them in silver.

LJS:  What’s one piece of advice you’d give to a student just starting out?
NR:  Dive in. Don’t worry about making mistakes. Most errors turn out to be happy accidents.

You can find more of her work at www.nicoleringgold.com

This slideshow requires JavaScript.

Class Spotlight: Perfect Pendants!

Stand out from the crowd with a truly unique custom pendant of your very own design!

Saturday + Sunday | July  16 + 17 | 11am-5:00pm | $240 | Register Now!

In this weekend workshop we’ll be exploring different styles and techniques to create your Perfect Pendant.  Learn to construct bezel settings for cabochon, faceted gemstones, and fancy shaped stones.  Working with sterling silver, we use hammer and stamps, as well as high polish, and oxidized finishes to accentuate textures and highlight designs. Students may bring their own stones or purchase from the tutor’s collection. Materials are provided.

Check out some of our students amazing work!!!


#Benchtip Tuesday! Resizing Rings with our New Ring Stretcher

When you’re in the business of producing handmade jewelry, time is just as valuable as money. Because of this we get really really excited about new tools that will reduce the amount of time it takes to do something. Like REALLY excited.
We recently picked up a ring stretcher/reducer and it has definitely lived up to the hype. It’s not the most inexpensive tool, however if you factor in the time you save, it’ll start paying for itself pretty quickly.
 ring resizer
Working with the Ring Resizer is pretty intuitive, however here are some tips to help you get up to speed.
-This tool only works with plain bands, such as wedding bands with no gemstones
-Always anneal your piece before stretching/reducing! You’ll want to fire coat your piece to protect the finish: brush on flux and heat the piece with a low soft flame until it starts to anneal or glow slightly red. Quench and pickle to remove the boric acid coating
-Don’t stretch or reduce too quickly – you may crack the metal
-always anneal between sessions
For reducing:
-place the ring in the circle that’s just slightly too small – the ring should sit slightly above. Push on the arm to squish it down, turn over the ring and repeat the process
ring resizer2
For enlarging
-Layering a piece of paper on the inside of the band prior to putting it on the enlarging mandrel helps to reduce the stretching marks on the inside of the ring. Saves you time during clean up.

Mold Making Workshop

Last weekend we had a really fun mold making workshop in the studio. This was the first time we offered this workshop, so it was really fun to watch!

Everyone brought small objects & jewelry to pour silicon & alginate over to create molds.

Everyone brought small objects & jewelry to pour silicon & alginate over to create molds.

Pouring the perfect mixture of the liquid silicon.

Pouring the perfect mixture of the liquid silicon.

Silicon mold

The molds set overnight while everyone took a well deserved break!

On day 2, everyone learned to cut their silicon molds open.


036shell mold


Everyone poured plaster into their molds to replicate their objects, You could also pour wax into your molds to then cast into metal! Everyone poured plaster into there molds.

The class experimented with alginate molds, and everybody molded their fingers.

The class experimented with alginate molds, and everybody molded their fingers.

We now have everyone's fingerprints!

We now have everyone’s fingerprints!


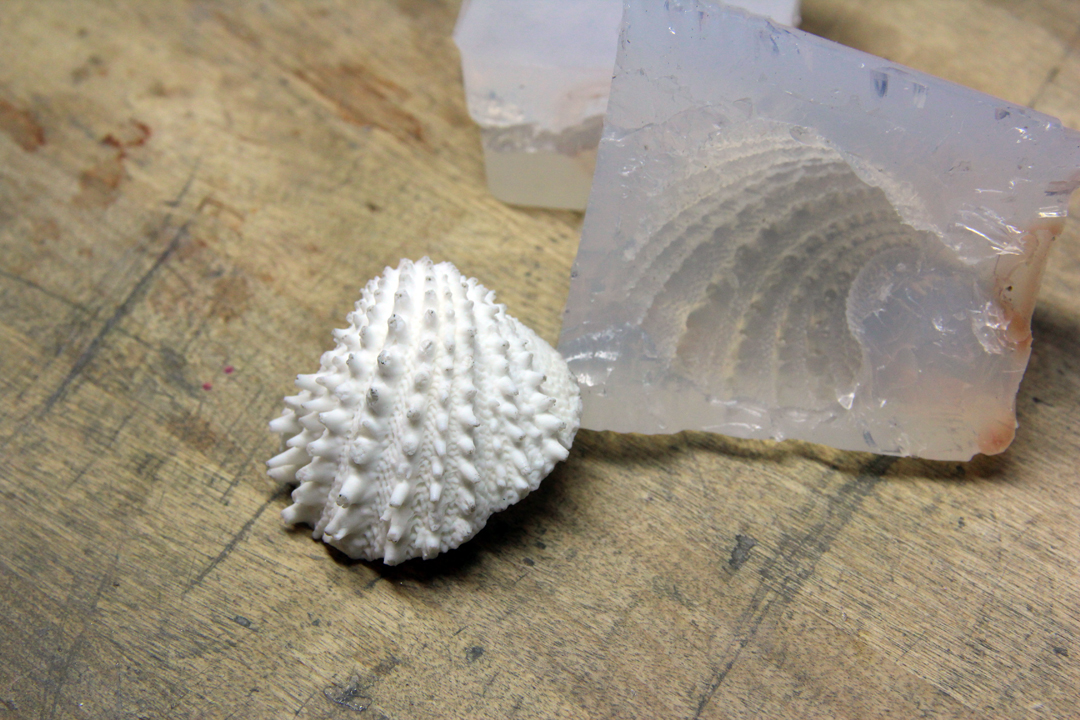
Studio Visit: Daniel Baez from Taba Casting

A few weeks ago in our Intermediate Wax Carving class we were lucky enough to get a visit from Daniel Baez, the owner of Taba Casting in the Jewelry District.

Daniel gave our students a lesson in mold making- the practice of using a model to create negative space within a rubber form. Molds are essentially what makes the jewelry production world go ’round. Knowing how the process works is essential to anyone interested in producing their pieces on a large scale.

002 copy

Molds can be made from any number of things- anywhere from a finished piece of metal jewelry, to natural forms like tree bark or animal bones. Basically anything than can withstand the heat of melted rubber can be used to make a mold.

004 copy

In order to create a rubber mold, the model is covered in layers of raw rubber and placed inside a vulcanization machine. This machine heats the rubber up to 375 degrees and melts the layers around the model to create a solid mold. Once the rubber is melted around the model, it is cut open to reveal the negative space inside, which is an exact replica of the original piece. Here Daniel cuts open a silicon mold.

007

After the mold is cut, a special type of wax is injected into the mold to create a wax version of the original model. This process can be repeated over and over to create any number of wax models which are then cast into metal to create multiples.

009 copy

There are so many kinds of molds! Interested in learning more about mold making creating multiples of your pieces? Check out our upcoming Mold Making workshop on August 10th and 11th!